The Scott #72 was issued in 1861 with an earliest known usage reported on August 17th 1861. Approximately 388,700 are estimated to have been produced. According to Lester G. Brookman, there are no varieties and the issue was produced from one plate called "18". The Scott #72 can be found in shades of blue, pale blue, dark blue and dull blue. It is typically found with black, blue, red and green colored cancels and many cancellation varieties exist.
New Rev5.1 Design, November 2007
Buy the Sonic Imagery Labs Specialty Perforation & Grill Multi -Gauge
Download Instruction Sheet for the Sonic Imagery Labs Specialty Perforation & Grill Multi -Gauge
Download a MAIL ORDER form for the Sonic Imagery Labs Specialty Perforation & Grill Multi -Gauge
Another Bogus Scott 519 - New November 2002
The Fake Scott 346 Private Perf - New October 2002
The Most Impressive Fake Scott 62B
The Secret Life of an Altered Scott 72
The Secret Life of a Chemically Altered Scott 78
The Secret Life of an Altered RW5 Duck Stamp
A Fake Scott #320 with Schermack Type III Perforations
Fake Scott #743a
Detecting a Flat Plate Press Vertical Coil, Fake Scott 441
Fake Reperfed 514a
Fake Reperfed 508c
Fake Reperfed 546
Fake Scott 143 w / Bogus Grill
Fake Scott 137 w / Same Bogus Grill as Fake 143
Fake Scott 139 w / Same Bogus Grill as Fake 137 and 143
Fake Scott 315 - Revised June 2002
Fake Reperfed Scott 519 - Revised June 2002
A Gallery of Bogus Stuff Part 1
A Gallery of Bogus Stuff Part 2
A Gallery of Bogus Stuff Part 3
A Gallery of Bogus Stuff Part 4
A Gallery of Bogus Stuff Part 5
Credits, Inspiration and Links of Interest
Bibliography of Research Material I Use for this Site
Download the Schermack Type III Go-NoGo Gauge

I received our specimen from Dundee Import and Export Services Ltd, incorporating Dundee Advisory Services, T/A "Crocodiles 'R' Us", (DIES&DAS Ltd) Australia on July 22nd 2002. DIES&DAS Ltd. was contacted by a special client, who suspected that several of their philatelic purchases may have been altered in some way.
Sonic Imagery Labs Philatelic Forensic Division, located in California has, for many months, had a special relationship with DIES&DAS Ltd. We have agreed to examine the items that DIES&DAS Ltd sent to us on behalf of their clients.
Provenance Information
At the time of publication of this report the only purchasing information we have is that it was purchased on eBay from seller ID "schuylerac". No eBay item number or date of purchase was provided.
Upon examination with only the naked eye the subject appears to be very well-centered, with a mottled cork type cancel in the lower left corner. There also appears to be a second cancel appearing in the lower right corner. It is not clear what the 2nd cancel is, or if it is a skip mark of the larger cancel, as the item is off cover. Genuine unaltered Scott #72's on cover are rare and command a premium .
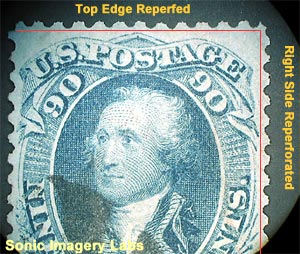
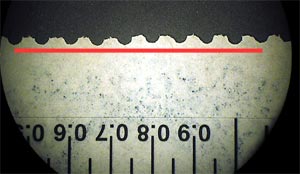
Under magnification and direct lighting, the first signs of alteration start to become clear. The red lines on the photomicrograph to the left help the eye judge the relative straightness of the perforation edge. The top edge and right edge has been completely reperforated.
Note that the perforation spacing on the upper right edge gets wider at about the 4th hole from the top. They are also not straight relative to our red guide line.
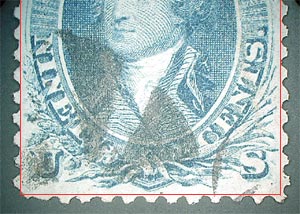
The red lines on the photomicrograph to the left help the eye judge the relative straightness of the perforation edge. This technique can be done at home if you have a computer and a scanner. Many image processing programs will allow you to draw perfect boxes or straight lines on scanned images.
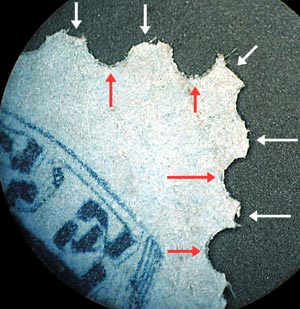
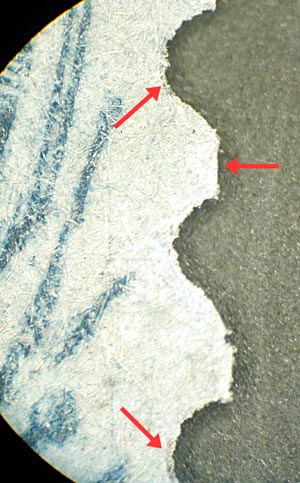
Under higher magnification, the extent of the alteration becomes more obvious. The red arrows are pointing to flecks of metal embedded in the paper fibers. The alterer's tool left these marks as the tool was punched through the paper. Also take note of the shape of the perforation holes edge. It is very clean and round. This is not normal. There should be the presence of short paper fibers sticking out in various random directions along the rim of the hole. The shape of the perforation holes should be more oval than round. This is because US stamps of this era were perforated with rotary perforators as shown below.
Here's a fun experiment. Take an ordinary store-bought fresh paper punch. The "squeezy" kind that schools make the kids buy in September. Punch a piece of 24 - 40 lb. white laser printer paper and look at it under high magnification and you will see a ridge and bevel like the fake. That's because the punch is ever so slightly larger than the hole it cuts through and crushes and pinches the paper flat before actually cutting through it. US stamps of this era do not have this characteristic. At least I cannot find it in any of my genuine stamps.
The white arrows in the picture to the left and above point out another faker's technique. The double cut and pull. By making a small cut on each side of the perf tip and then grabbing the tip end with tweezers and pulling, the faker can make the tip produce loose fibers sticking out like a genuine stamp. The right edge doesn't quite do this because the cuts went too deep into the tip. Why would the faker do this? Most likely the right edge of the stamp was either a straight edge or a wide margin. By reperforating that edge the faker could make the stamp appear more centered. Remember centering is one factor that defines value. (F, F-VF, XF, and Superb)
 The image of the wheels shown here illustrates how stamps were perforated. The sheet of stamps is shown as the letter "C". The wheel "A" has pins that punch the holes into the sheet of stamps and line up with matching holes in wheel "B".
Because the contract printers for the post office department used this method, it produces slightly oval holes. Oval shaped holes makes the forger's life very difficult. Conversely it helps us detect when a stamp has been reperforated.
Check out the fake Scott #519 article on this website and note the similarities of the perforation alterations. Then check out the RW5 reperforation job and note the different reperforation "fingerprint".
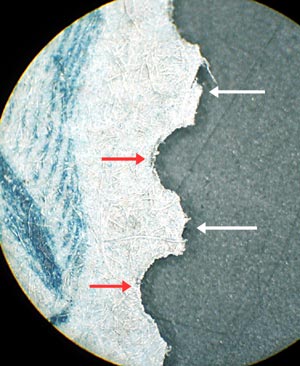
Top edge at medium magnification and viewed from the back of the stamp. Note the perforation holes and how they wander relative to the straight red line. Each perf tip has the characteristic paper fiber tuft at the center. This is typical of the double cut and pull method of alteration.
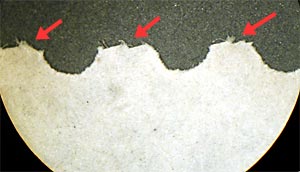
Here is the top edge at high magnification and viewed from the back of the stamp. The double cut and pull method of alteration can be seen very easily at high magnifications (30 - 40X). Red arrows point to the aforementioned paper fiber tufts.

The left edge of the stamp does not appear to be perforated. It has been tidied up and trimmed a bit to make it appear more gem like. The illustration is from the back of the stamp.
More evidence of alteration. Tool marks and cut perf tips.
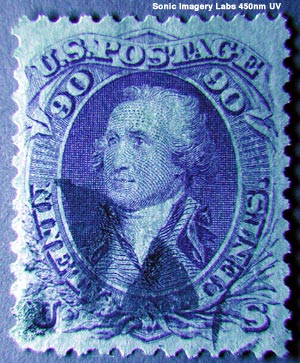
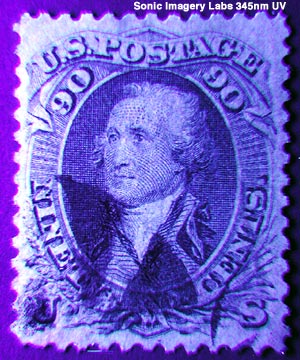
The following images are of our subject exposed to different wavelengths of UV light. Why is this important and why do we care? Because by changing our light source, its discrete wavelength, and its intensity we can cause atoms and molecules of differing materials to fluoresce, glow, absorb, or change color to detect flaws or other hidden defects that our eyes can't normally see. This technique also reveals whether certain modern-day cleaning fluids or acrylic paints or inks have been applied to the stamp to enhance it in some way.
When I first examined the subject, I was sure it had been cleaned. During this UV analysis, the lab technician (me) has a known good Scott #72 off to the side so I can quickly compare characteristics that I might not notice as different. Under the eerie glow of monochromatic light sources, one's eyes also can play tricks on the mind. The brain loves to see things that are not there. Always good to compare to make sure.
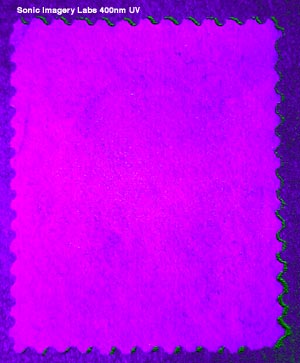
I was sure it would glow oddly at this wavelength of exposure. So far no evidence of chemical alteration such as bleaching and so far no evidence of repairs. There also is no evidence of tears or filled thins.
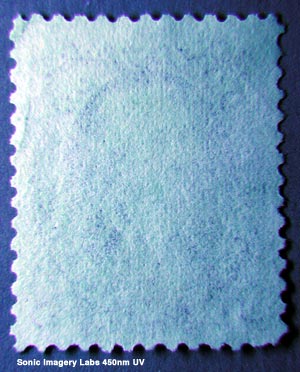
No evidence of chemical alteration such as bleaching. There also appears to be no evidence of repairs, tears or filled thins on the back side as well. The stamp is actually in physically very good shape other than the major reperforation job.
I am still cautious about the subject stamp's cleaned status, considering its provenance. The stamp does not show evidence of staining, browning or fading which is typical of the early classics.
Still no evidence of repairs, tears or filled thins on the back side as well. The stamp is truly in physically very good shape.
Conclusion:
Though I found no evidence of cleaning under UV light sources, that only means that if the stamp was cleaned, it was cleaned with a substance that lacked a fluorescent whitening agent. Many cleaners and laundry soaps have chemical whiteners which are fluorescent. This is why we can detect this under UV light. On the other hand many chemical solvents do not have brighteners but will remove stains. Aniline inks will become soft if left in many solvents and ink color will also change. In my opinion, what is unusual about this stamp is the feel of the stamp. It is slick on the face. Slightly slippery. Like how your car might feel after a wax and polish. This could be evidence of a chemical solvent softening the raised ink impressions but I have no exact way to prove this without a doubt.
Thanks for visiting this site. I hope you learn something new as I am having fun doing this and stirring up the "doodoo" so to speak. You, the visitor, have my permission to copy my pages and images for the purpose of showing others how to look for fakes and forgeries. You also have my permission to link to my pages and to share the link paths to others. I only ask in return for you to send me an e-mail if I have made a mistake or have done some other technical blunder that in my rush to put these pages up would cause the visitor confusion. Please also visit my other website www.slingshotvenus.com and support the live music arts.