I have always loved the images found on this series of stamps. The images of the ducks are always from world class artists, and the engravings are wonderful things to look at under a microscope. And, what's even more cool about this series is that the used stamp always has someone's signature on it. The signature is that of the hunter who bought the permit. The signature is required to validate the permit and the hunter must always carry it with him while hunting. That simple fact now opens a world of history. I have always imagined a postal historian tracking down the person behind the signature and hearing wonderful stories of adventure and expeditions to various wetlands, forests, camp fire stories and family history spanning several generations.
Some technical history and design specifications:
This series of stamps was authorized by an Act of Congress, approved March 16, 1934, to license hunters. Receipts go to maintain waterfowl life in the United States. Sales to collectors were made legal June 15th, 1935. If I remember my postal history right, the stamp images are selected though a competition of artists to determine the winning design.
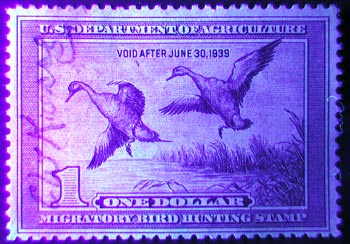
The Scott number RW5 shown below was made by an engraved flat plate printing. The paper is unwatermarked and it is perforated 11 using a common perforation gauge.
Another Bogus Scott 519 - New November 2002
The Fake Scott 346 Private Perf - New October 2002
The Most Impressive Fake Scott 62B
The Secret Life of an Altered Scott 72
The Secret Life of a Chemically Altered Scott 78
The Secret Life of an Altered RW5 Duck Stamp
A Fake Scott #320 with Schermack Type III Perforations
Fake Scott #743a
Detecting a Flat Plate Press Vertical Coil, Fake Scott 441
Fake Reperfed 514a
Fake Reperfed 508c
Fake Reperfed 546
Fake Scott 143 w / Bogus Grill
Fake Scott 137 w / Same Bogus Grill as Fake 143
Fake Scott 139 w / Same Bogus Grill as Fake 137 and 143
Fake Scott 315 - Revised June 2002
Fake Reperfed Scott 519 - Revised June 2002
A Gallery of Bogus Stuff Part 1
A Gallery of Bogus Stuff Part 2
A Gallery of Bogus Stuff Part 3
A Gallery of Bogus Stuff Part 4
A Gallery of Bogus Stuff Part 5
Credits, Inspiration and Links of Interest
Bibliography of Research Material I Use for this Site
Download the Schermack Type III Go-NoGo Gauge
New Rev5.1 Design, November 2007
Buy the Sonic Imagery Labs Specialty Perforation & Grill Multi -Gauge
Download Instruction Sheet for the Sonic Imagery Labs Specialty Perforation & Grill Multi -Gauge
Download a MAIL ORDER form for the Sonic Imagery Labs Specialty Perforation & Grill Multi -Gauge
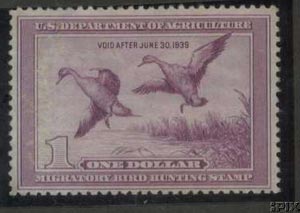
Above: The original RW5 as sold on 4/13/2002.
On April 13th 2002, The Federal Hunting Permit stamp shown to the left was sold by eBay seller "cgstampsus@aol.com" as part of a lot of 3 stamps, as eBay item 1344648428 . The lot consisted of a used RW4, RW5 and RW6 and the auction closed at $22.01. The SCADS (Stamp Collectors Against Dodgy Sellers) investigative team would like to thank "cgstampsus@aol.com" for leaving the images of the stamp they sold up on the web until we could get this page published.
The lot was described as follows:
RW4-RW6 SIGNED CV $160
Three nice examples of the Federal duck stamps from 1937-1939. RW4 has a light crease, others are no faults. Nice group. NO RESERVE!
The lot was purchased by eBay user "stamps55" out of Brooklyn, New York. The original image from this auction is shown to the left.
It should be noted that the catalog value stated above is for all 3 stamps of the lot in USED F-VF condition.
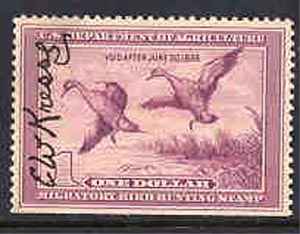
Above: The same RW5 as sold on 4/19/2002.
On April 19th 2002, The Federal Hunting Permit stamp shown to the left was listed on eBay as Item number 1347574601 by "stamps55" of Brooklyn, New York.
It was described as follows:
SCOTT #. RW-5 F-VF. N.H. RETAIL$400.-+
#. RW-5 SCARCE MAYBE REG. N.H. SOUND NO THINS OR CREASES. ADD 2. S.H.
The auction closed on April 26th, 2002 and the closing hammer was $204.52. It was purchased by eBay user "dpape_scn" of Boise, Idaho. "dpape_scn" received his item and noticed that the stamp "looked a little funny", but did nothing further till he was by chance contacted by the SCADS (Stamp Collectors Against Dodgy Sellers) investigative team as part of their follow-up of the three stamps' alterations by "stamps55". As part of his subsequent campaign to expose these fraudulent alterations, "dpape_scn" kindly sent his stamp to me for further analysis.
I am a Forensic Philatelic Investigator.
(Peter Gunn/Dragnet music swells in the background.)
This is my laboratory.
(Music getting louder)
I look at small things that make a big difference at very high magnifications.
(Music cresendos)
I am NERDMAN F.P.I.!
(Music stops, camera pulls back showing a laboratory of flashing lights and dials.)
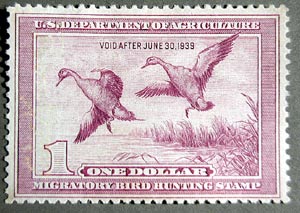
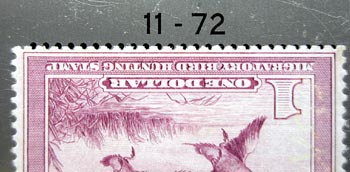
Above: The RW5 sent to me on 5/31/2002.
I received the RW5 in question on May 31st, 2002. It is shown on the left. The first thing I noticed, which sadly can't be photographed, was the feel of the stamp. It is kind of weak and floppy. Not stiff and crisp like a mint stamp. An analogy might be the feeling of a fresh dollar bill right from the bank. This stamp has the feeling of a well-used dollar bill that's been around awhile.
On closer inspection, I notice that something's wrong with the bottom edge of perforations. Let's start here, as I can capture this photographically.
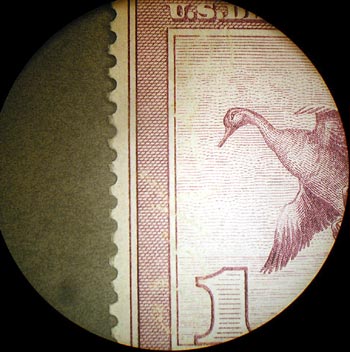
Above: Perforation check of genuine top edge.
--A Perf Job---
The quickest way to determine a bad reperforation job is to use a US Specialty Gauge invented by Richard Kiusalas around 1965. It is specifically intended for US stamps only and applies to issues before the 1950's or so. It is accurate to .0005 inches and also gauges the perforation hole diameter as well. The image to the left shows that the perfs on the top edge are indeed genuine. We can see that the perforation hole diameters are correct as well.
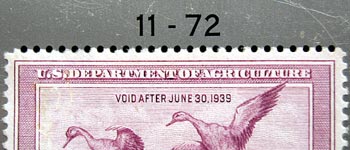
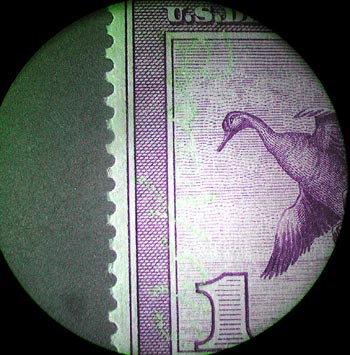
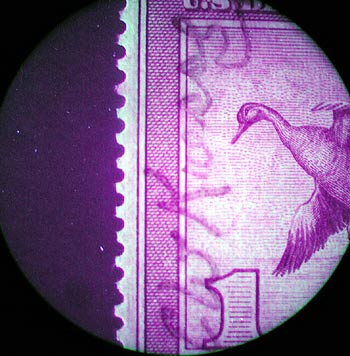
Above: Perforation check shows bottom edge found to be altered.
--A Perf Job---
The bottom edge of the stamp does not gauge out correctly, as you can see in the image to the left. We can confidently say that this edge has been badly reperforated by the faker / alterer / forger. Not only is the gauging or spacing wrong, the hole diameters are the wrong size as well.
 The image of the wheels shown here illustrates how flat plate press stamps were perforated. The sheet of stamps is shown as the letter "C". The wheel "A" has pins that punch the holes into the sheet of stamps and line up with matching holes in wheel "B".
Because the BoEP (Bureau of Engraving and Printing) used this method, it makes the forger's life very difficult. And makes for detecting fake perfs easy for us, as will be explained more below.
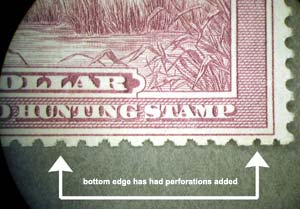
Above: Perforation check of bottom edge found to be altered.
--A Perf Job---
Here's a closer view of the bogus perforations in the image to the left. Notice the ragged edges on the bottom edge, and compare them to the right vertical edge. US stamps of this era are perforated using the rotary perforation method outlined above and to the right. They are never perfectly round. In fact, they are usually slightly oval and one edge of the hole usually has some paper fiber or tufts of fiber on one side of the hole. This occurs because the pin that makes the hole in the sheet enters the paper at an angle and pulls out of the paper at an angle. The tufts are always on the same side of the hole in the row.
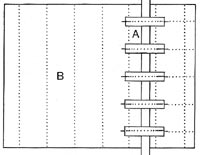 Some other things to note about real perforations. The wheels "A" in the picture to the right almost never line up with the adjacent wheels. So if you have a fully reperforated stamp, and the left and right side perfs line up perfectly or the top and bottom perf line up perfectly, it should be suspected as an alteration or reperf job.
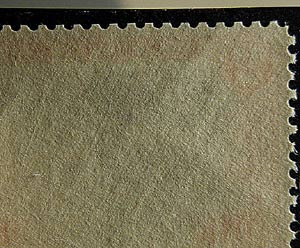
Above: Gum comparison with a issue from the same era or a known genuine equilvalent.
--A Gum Job---
The next thing I note in this report is that the gum on the back of our subject doesn't seem right. Its not bright and doesn't want to stick to my fingers like a real genuine BoEP (Bureau of Engraving and Printing) gummed stamp. This is another hard thing to photograph, but I will do my best to explain visually.
There once was a time when the term "original gum" (OG) was not used very often, as a stamp had gum or it didn't. Whether a stamp was hinged or not was also of little consequence. Today, times have changed. It seems that collectors now are more concerned with a stamp's gum than any other feature. This is clearly reflected in premium prices for "never hinged / original gum" stamps.
It has therefore become quite profitable for the faker to regum stamps whose original gum has either become flawed or, in the case of our stamp, removed because it was originally a USED stamp soaked off a hunting license.
The photo to the left is an image of a genuine original gum, no hinge stamp. The BoEP used a special water-based gum. Over time, the trapped water molecules in the gum evaporate and the gum will form very tiny hairline cracks, as you can see in the genuine image to the left. This is not a determining factor when looking for a regum job. It is just something that I like to note when I compare 2 stamps of a series that is 64 years old.
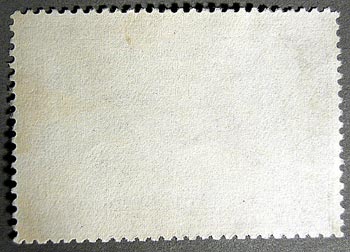
Above: Gum of the suspect RW5
--A Gum Job---
The image to the left is the back of our RW5 suspect stamp. The color is not like that of the genuine article. This is also not a determining factor, as all gum deteriorates at different rates depending on environmental conditions, and the color change will be different from stamp to stamp. What is different from the genuine article is that the gum on the altered stamp is very thin. The paper texture stands out when light is cast on it at an extreme angle.
What we need to find is clear evidence of regumming. Since stamps are gummed before perforating, it stands to reason that the perforation tips should have no gum on them. The face of the stamp should also never have gum on it.
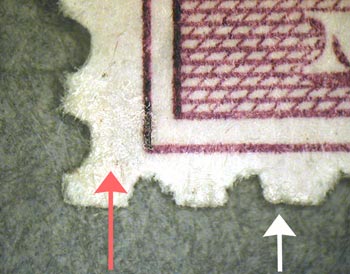
Above: Evidence of regumming.
--A Gum Job---
The image to the left is the lower left corner of our RW5 suspect stamp. The white arrow clearly shows evidence of gum trapped within the perf tip fibers. The red arrow is pointing to the faker's concoction of gum that leaked on to the face of the stamp. We now have our smoking gun. This item clearly has been regummed.

Above: Evidence of regumming.
--A Gum Job---
The image to the left is the right vertical edge of our RW5 suspect stamp as viewed from the back. The white arrows show evidence of gum trapped within the perf tip fibers of the original genuine perforation. Remember that stamps are gummed first and then perforated after the gum has dried. On a genuine stamp, this happening is an impossibility.
I saved the best for last. Read on below.
Above: Suspicious face scuff.
--Cleaning and Signature Removal---
Here is a photomicrograph of our suspect under 3900 kelvin tungsten halogen lighting. This is close to the typical lighting found in your home. The regular tungsten bulb in your home burns at 3200 to 3400 kelvin. This lighting is also what we electrical engineers call broad band lighting, and is made up of every wavelength (color) of light from purple blue (250-ish nanometer wavelengths) to red and infrared (790-ish nanometer wavelengths). When every discrete wavelength (color) of light is combined, mixed up, or reflected together at random intensities (amplitude) of brightness, it appears white to the human eye.
Why is this important and why do we care? Because by changing our light source, its discrete wavelength, and its intensity we can cause atoms and molecules of differing materials to fluoresce, glow, absorb, or change color to detect flaws or other hidden defects that our eyes can't normally see.
As you can sort of see at 28x magnification, the face of the stamp has what appears at first glance to be some face scuffs.
Above: Suspicious face scuff under long wave UV.
--Cleaning and Signature Removal---
Here is a photomicrograph of our suspect stamp being illuminated by what is called in the physics world as long wave narrow band ultraviolet light. Its peak intensity occurs around 345 nanometers and it is made up of about 40 discrete colors of ultraviolet light. When you go to a tanning salon, this is what they blast you with, albeit much brighter.
You can start to see that our face scuff is starting to look like something else. Let's explore this angle further below.
Above: Suspicious face scuff under short wave UV. Evidence of a removed signature.
--Cleaning and Signature Removal---
Here is a photomicrograph of our suspect stamp being illuminated by what is called shortwave very narrow band ultraviolet light. Its peak intensity occurs around 250 nanometers and it is made up of about 20 discrete colors of ultraviolet light. It is also commonly called black light. Why? Because human eyes are not very sensitive to these wavelengths and the light source appears black.
My camera's CCD detector fortunately is very good at detecting this wavelength. I guess by now it's pretty clear what's going on here. The faker has attempted to clean off the signature, reperf the stamp, then regum. This makes the stamp appear as mint and increases the faker's margin of profit by 10 to 20 times.
Above: The suspect RW5 under short wave UV.
--Conclusion---
Since this is an educational web site, let's review what we have learned so far.
1. Fakers and forgers are usually not very well educated in the genuine art and science of government manufacturing of a postage stamp. And they are usually sloppy as well. This is readily apparent when examining the reperforated bottom edge. Had the faker used a cutting tool that was .03875 inches in diameter, the hole size would have gauged correctly. Had the faker also known that this issue is a perforation of 11 holes every 2 centimeters and that each hole is spaced 0.072 inches, plus or minus 0.0005 inches apart, he might have fooled a few people. But he didn't. Hence the sloppy part. I must give him a little credit though. These tolerances of measurement are extremely hard to achieve even for the BoEP of 1938-39. But they did, and hence we have the standards we use today for detecting fakes. No matter how hard a faker will try, if he doesn't have the rotary perforating machine, he will never fool an expertizer.
2. Fakers and forgers are usually not very well educated in the science of chemistry and the physics of light. I am. By using a chemical solvent to remove the ink signature, the faker changed the ink molecules atomic structure. The solvent stripped only the dye component of the original signature, but the binder molecules are still locked to the paper. Because the remaining binder molecules are larger than the wavelength of light hitting it, that light is absorbed, and the signature appears black under that particular wavelength of light.
3. This proves another point. Forgers and fakers with greedy hearts usually become consumed with evil doings and, being immersed in the darkside, push the envelope to a point were the rational intelligent logical mind no longer functions correctly and mistakes are always made. This makes my job of detecting alterations, fakes and forgeries much easier.
Above: The suspect RW5 under normal lighting conditions.
I am a Forensic Philatelic Investigator.
(Peter Gunn/Dragnet music once again swells in the background.)
This is my city. (Music getting louder)
I look at really small things on postage stamps that make a big difference at very high magnifications and under various coherent and incoherent light sources.
(Music cresendos) I am .....NERDMAN F.P.I. (Forensic Philatelic Investigator)
Credits begin rolling:
I really need to thank and credit the SCADS (Stamp Collectors Against Dodgy Sellers) investigative team and, Dick Pape of Idaho, for loaning me the RW5 you have just seen. Without his and the SCADS team's help this page would not exist.
Thanks for visiting this site. I hope you learn something new as I am having fun doing this and stirring up the "doodoo" so to speak. You, the visitor, have my permission to copy my pages and images for the purpose of showing others how to look for fakes and forgeries. You also have my permission to link to my pages and to share the link paths to others. I only ask in return for you to send me an e-mail if I have made a mistake or have done some other technical blunder that in my rush to put these pages up would cause the visitor confusion. Please also visit my other website www.slingshotvenus.com and support the live music arts.