How It's Done and Other Technical Stuff.
How To Make My Franklin's Huge.
Since I can't make the CCD pixel elements in the scanner have more resolution than they already have. And I don't want to buy a $20,000 professional drum scanner. I needed to come up with a way to make my stamps grow in size. By growing the size of the stamps, the scanner will have more pixels to use to help render the fine details I am trying to capture.
Add Water and They Will Grow.
Well ...that won't really work. Adding water that is. But my solution is to use my medium format camera with a specialized macro lens and some extension tubes. The trick here is to produce an image on a piece of film, at least 2 to 2.5 times larger than the original stamp itself. I chose not to use a 35 mm format camera because that would only produce a film image about as tall as the stamp itself. No help here. So a 2 1/4 inch film format is used instead.
A coworker and photo restoration buff recommended I use negative film as opposed to slide film for exposure dynamic range. Common sense told me to purchase the finest grain film so the scanner won't see film grain dots and speckles. And my favorite camera store, Keeble and Schucat in Palo Alto, provided the extension tubes for the macro lens.
The macro lens is a Mamiya APO 120 mm macro capable of focusing down to about 1 inch. There is 75 millimeters worth of extension tubes between the lens and the camera body which now makes the 120 mm focal length become about 195 mm. This makes for quite a heavy and long lens setup, but now gives me the ability to magnify the subject to almost 2.2 times it's original size.
Bad Things Happen.
With all things physical in nature, bad things happen. Scientist's call this Murphy's Law. Engineers call this "needing more R and D." I call it "Being so excited about the task at hand, go ahead and stop thinking about the technical issues and what I am really doing at the moment."
Bad Things To Watch For. Part 1.
To calculate proper exposure, I use an incident light meter. My light sources where a pair of 500W tungsten halogen Sears Brand shop lights on a tripod stand. We need lots of light to fully illuminate or tiny subjects and because we have to set our aperture very small, the more light we have, the faster shutter speed we can use. This should equate to sharper images.
What really happens is that the shop lights increase the room temperature by 5 degrees every 45 seconds. Think of the lights as 1000W space heaters that make light as a byproduct. Any object in the path of the light gets very hot. Stamps being in the center of all this photonic activity first start to curl. Then they turn brown. Then they catch on fire. The smoke and soot from the burning stamp will stain the front element of the macro lens. If it hasn't fallen off from the heat already.
My recommendation is don't do this. Shop lights work better in the shop while changing the oil of your car.
Bad Things To Watch For. Part 2.
With the shop lights safely back in the garage, a new plan of attack needs to be taken. Instead of using shop lights I pull out 2 strobe heads and the AC powered strobe pack. Basically these are flash packs that are used in portrait studios. To calculate proper exposure, I now have to use a flash exposure meter. This is better as we now no longer have to worry about melted cameras and stamps becoming ashes. Electronic flashes also create a high intensity light pulse that usually only lasts about 1000th to 4000th of a second. This makes for sharp images.
After shooting my first roll of film, I ran down to my favorite processing lab around the corner from my Santa Clara office. I handed my precious roll to the counter person and she said it would be ready in 2 hours. I arrived at the proper time and flopped the strip of film on to the light table. Most disappointing results. Murphy's Law strikes again.
Most medium and large format cameras do not have through the lens light meters for calculating exposure. This is why we carry around handheld light meters. What "we"(1) failed to do was compensate for the light loss in the extension tubes. After crunching the numbers in my calculator, I found that all my images where underexposed by 3.5 stops. I should of known this but that's what R and D is all about.
(1) Have you ever noticed that when doctors fail to fix or diagnose something they always say "Hmmmm ..... Looks like "WE" missed that on your tests."
Bad Things To Watch For. Part 3.
The last technical "blow it" can be seen to the left. Sure the exposure is 3 and a half stops to dark, but also notice that there is only half the image on the negative. Those versed in the photographic arts might think that I forgot to set the shutter to the proper sync speed for the flash but this isn't actually the case.
What is actually happening is that when the shutter is released, a mechanical lever in the camera closes or stops down the aperture iris located in the lens, to the proper position. It then swings the mirror for the viewfinder out of the way so that the shutter can open and expose the film.
Because the macro lens is now mounted 3 inches from the camera on extension tubes, the lever mechanism that does all this work of moving the mirror out of the way and closing the iris, now has to work 3 times as hard to do the job.
As you can see, it became the little lever that "couldn't". That is what the mirror lock up feature is for on most 35 mm SLR cameras. The same holds true for 2 1/4 medium format SLR's as well.
"We" just failed to remember to use it. Good thing I am not a doctor.
Finally, Some Success.
After our initial failure analysis was complete. It was time to start again. With the fire extinguisher put back, proper flash gear set up, proper exposure calculated, and mirror locked up feature enabled we can get on with business.
The image to the right shows the actual negative size with the Franklin image now about 2.2 times it's normal size. The stamp in the center is the original size for reference.
The Secret To High Resolution Revealed.
Here's how we get the images so sharp. Remember that the scanners maximum optical resolution is 2400 pixels per inch. By photgraphing the stamp with the macro lens and extension tube combination, we have effectively enlarged the stamp by 2.2 times life size. A VF-XF life size Franklin measures about 0.95 inches in height . On the film negative, the stamp now becomes 2.1 inches tall. So - now my real scanning resolution when scanning the negative of the Franklin becomes 2400 ppi times 2.2. This equates to scanning a real Franklin at an optical resolution of 5280 pixels per inch. Shharrrppp.
Now a single pixel on the scanner appears to shrink from 0.000416 inches to 0.00018 inches. If you use this technique to scan your stamps and are lucky enough to own a scanner who's maximum optical resolution is 4800 ppi, then you could actually create computer graphic scanned images with over 10,000 ppi resolution.
Really sshharrpppp.
With All Good Things.
With all good things there is compromise. This holds true in life as well as analog and digital photography. Now that you too can create high resolution computer images, I have one more word of caution! Have a big hard disk. After scanning all 100 positions of the Government Reprint of 1875 (Scott 40) I ended up with 5.5 Gigabytes of raw TIFF images. Thats 8 and a half CD-Roms! OUCH.
Thats all I am gonna say about that. You get the picture, right?
DISCLAIMER and COPYRIGHT INFORMATION:
Thanks for visiting this site. I hope you learn something new as we are making new discoveries all the time. You, the visitor, have my permission to link to my pages and to share the INFORMATION with others. The images themselves fall under the fair use guidelines established by the United States Congress and Copyright law. Basically contact us before using. I also ask in return that you send me an e-mail if I have made a mistake, or have made some other technical blunder that in my rush to put these pages up would cause the visitor confusion. Please also visit my other website at www.slingshotvenus.com. and support the live music arts. While your there, be sure to purchase our music. There are not many philatelic rock stars around and we need all the help we can get. :-)
I can be reached at: nerdman@ix.netcom.com
Copyright © 2001-2006 Richard Doporto, Sonic Imagery Labs
Update 11/17/06
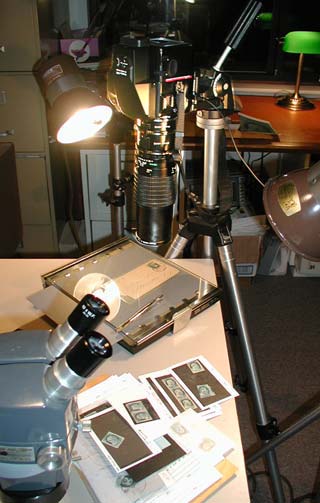
Figure 1. (above) The final camera setup after the high intensity photon induced fire.
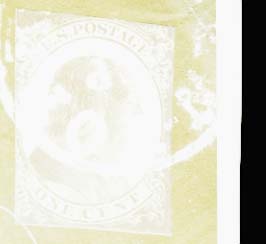
Figure 2. (above) A 3.5 stop error in exposure will produce a poor negative as shown.
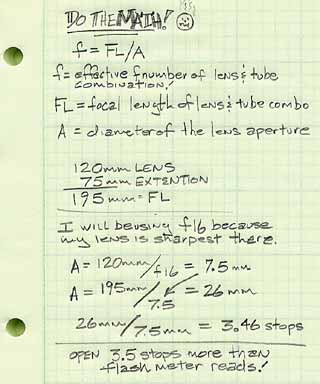
Figure 3. (Above) Always do the math when using dangerous lights and big cameras. One could lose an eye or injure the ego needlessly.

Figure 4. (Above) Failure to use the mirror lock up feature will produce only a half of an image when using extension tubes and long focal length macro lenses.
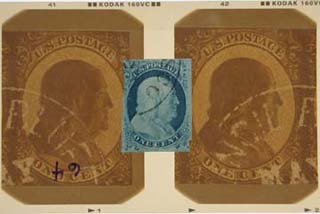
Figure 5. (above) Relative sizes compared.
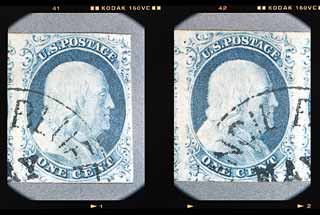
Figure 6. (above) Proper exposure helps alot too.